FAQ (Frequenty Asked Questions)
You may link to this document using short form: https://www.dearimgui.org/faq or its real address: https://github.com/ocornut/imgui/blob/master/docs/FAQ.md or view this file with any Markdown viewer.
Index
Q&A: Basics
Q: Where is the documentation?
This library is poorly documented at the moment and expects of the user to be acquainted with C/C++.
- Run the examples/ and explore them.
- See demo code in imgui_demo.cpp and particularly the
ImGui::ShowDemoWindow()function. - The demo covers most features of Dear ImGui, so you can read the code and see its output.
- See documentation and comments at the top of imgui.cpp + general API comments in imgui.h.
- Dozens of standalone example applications using e.g. OpenGL/DirectX are provided in the examples/ folder to explain how to integrate Dear ImGui with your own engine/application.
- Your programming IDE is your friend, find the type or function declaration to find comments associated to it.
Q: Which version should I get?
I occasionally tag Releases but it is generally safe and recommended to sync to master/latest. The library is fairly stable and regressions tend to be fixed fast when reported.
You may also peak at the docking branch which includes:
Many projects are using this branch and it is kept in sync with master regularly.
Q: Why the names “Dear ImGui” vs “ImGui”?
TL;DR: Please try to refer to this library as “Dear ImGui”.
The library started its life as “ImGui” due to the fact that I didn't give it a proper name when when I released 1.0, and had no particular expectation that it would take off. However, the term IMGUI (immediate-mode graphical user interface) was coined before and is being used in variety of other situations (e.g. Unity uses it own implementation of the IMGUI paradigm). To reduce the ambiguity without affecting existing code bases, I have decided on an alternate, longer name “Dear ImGui” that people can use to refer to this specific library.
Return to Index
Q&A: Concerns
Q: Who uses Dear ImGui?
You may take a look at:
Q: Can you create elaborate/serious tools with Dear ImGui?
Yes. People have written game editors, data browsers, debuggers, profilers and all sort of non-trivial tools with the library. In my experience the simplicity of the API is very empowering. Your UI runs close to your live data. Make the tools always-on and everybody in the team will be inclined to create new tools (as opposed to more “offline” UI toolkits where only a fraction of your team effectively creates tools). The list of sponsors below is also an indicator that serious game teams have been using the library.
Dear ImGui is very programmer centric and the immediate-mode GUI paradigm might require you to readjust some habits before you can realize its full potential. Dear ImGui is about making things that are simple, efficient and powerful.
Dear ImGui is built to be efficient and scalable toward the needs for AAA-quality applications running all day. The IMGUI paradigm offers different opportunities for optimization that the more typical RMGUI paradigm.
Q: Can you reskin the look of Dear ImGui?
Somehow. You can alter the look of the interface to some degree: changing colors, sizes, padding, rounding, fonts. However, as Dear ImGui is designed and optimized to create debug tools, the amount of skinning you can apply is limited. There is only so much you can stray away from the default look and feel of the interface. Dear ImGui is NOT designed to create user interface for games, although with ingenious use of the low-level API you can do it.
A reasonably skinned application may look like (screenshot from #2529) 
Q: Why using C++ (as opposed to C)?
Dear ImGui takes advantage of a few C++ languages features for convenience but nothing anywhere Boost insanity/quagmire. Dear ImGui does NOT require C++11 so it can be used with most old C++ compilers. Dear ImGui doesn't use any C++ header file. Language-wise, function overloading and default parameters are used to make the API easier to use and code more terse. Doing so I believe the API is sitting on a sweet spot and giving up on those features would make the API more cumbersome. Other features such as namespace, constructors and templates (in the case of the ImVector<> class) are also relied on as a convenience.
There is an auto-generated c-api for Dear ImGui (cimgui) by Sonoro1234 and Stephan Dilly. It is designed for creating binding to other languages. If possible, I would suggest using your target language functionalities to try replicating the function overloading and default parameters used in C++ else the API may be harder to use. Also see Bindings for various third-party bindings.
Return to Index
Q&A: Integration
Q: How can I tell whether to dispatch mouse/keyboard to Dear ImGui or to my application?
You can read the io.WantCaptureMouse, io.WantCaptureKeyboard and io.WantTextInput flags from the ImGuiIO structure.
e.g. if (ImGui::GetIO().WantCaptureMouse) { ... }
- When
io.WantCaptureMouseis set, imgui wants to use your mouse state, and you may want to discard/hide the inputs from the rest of your application. - When
io.WantCaptureKeyboardis set, imgui wants to use your keyboard state, and you may want to discard/hide the inputs from the rest of your application. - When
io.WantTextInputis set to may want to notify your OS to popup an on-screen keyboard, if available (e.g. on a mobile phone, or console OS).
Note: You should always pass your mouse/keyboard inputs to Dear ImGui, even when the io.WantCaptureXXX flag are set false. This is because imgui needs to detect that you clicked in the void to unfocus its own windows.
Note: The io.WantCaptureMouse is more accurate that any manual attempt to “check if the mouse is hovering a window” (don't do that!). It handle mouse dragging correctly (both dragging that started over your application or over an imgui window) and handle e.g. modal windows blocking inputs. Those flags are updated by ImGui::NewFrame(). Preferably read the flags after calling NewFrame() if you can afford it, but reading them before is also perfectly fine, as the bool toggle fairly rarely. If you have on a touch device, you might find use for an early call to UpdateHoveredWindowAndCaptureFlags().
Note: Text input widget releases focus on “Return KeyDown”, so the subsequent “Return KeyUp” event that your application receive will typically have io.WantCaptureKeyboard == false. Depending on your application logic it may or not be inconvenient. You might want to track which key-downs were targeted for Dear ImGui, e.g. with an array of bool, and filter out the corresponding key-ups.)
Q: How can I use this without a mouse, without a keyboard or without a screen? (gamepad, input share, remote display)
- You can control Dear ImGui with a gamepad. Read about navigation in “Using gamepad/keyboard navigation controls”. (short version: map gamepad inputs into the io.NavInputs[] array + set
io.ConfigFlags |= ImGuiConfigFlags_NavEnableGamepad). - You can share your computer mouse seamlessly with your console/tablet/phone using Synergy This is the preferred solution for developer productivity. In particular, the micro-synergy-client repository has simple and portable source code (uSynergy.c/.h) for a small embeddable client that you can use on any platform to connect to your host computer, based on the Synergy 1.x protocol. Make sure you download the Synergy 1 server on your computer. Console SDK also sometimes provide equivalent tooling or wrapper for Synergy-like protocols.
- You may also use a third party solution such as Remote ImGui or imgui-ws which sends the vertices to render over the local network, allowing you to use Dear ImGui even on a screen-less machine. See Wiki index for most details.
- For touch inputs, you can increase the hit box of widgets (via the
style.TouchPaddingsetting) to accommodate for the lack of precision of touch inputs, but it is recommended you use a mouse or gamepad to allow optimizing for screen real-estate and precision.
Q: I integrated Dear ImGui in my engine and the text or lines are blurry..
In your Render function, try translating your projection matrix by (0.5f,0.5f) or (0.375f,0.375f). Also make sure your orthographic projection matrix and io.DisplaySize matches your actual framebuffer dimension.
Q: I integrated Dear ImGui in my engine and some elements are clipping or disappearing when I move windows around..
You are probably mishandling the clipping rectangles in your render function. Rectangles provided by ImGui are defined as (x1=left,y1=top,x2=right,y2=bottom) and NOT as (x1,y1,width,height)
Return to Index
Q&A: Usage
Q: Why are multiple widgets reacting when I interact with a single one?
Q: How can I have multiple widgets with the same label or with an empty label?
A primer on labels and the ID Stack...
Dear ImGui internally need to uniquely identify UI elements. Elements that are typically not clickable (such as calls to the Text functions) don't need an ID. Interactive widgets (such as calls to Button buttons) need a unique ID. Unique ID are used internally to track active widgets and occasionally associate state to widgets. Unique ID are implicitly built from the hash of multiple elements that identify the “path” to the UI element.
- Unique ID are often derived from a string label:
Button("OK");          // Label = "OK",     ID = hash of (..., "OK")
Button("Cancel");      // Label = "Cancel", ID = hash of (..., "Cancel")
- ID are uniquely scoped within windows, tree nodes, etc. which all pushes to the ID stack. Having two buttons labeled “OK” in different windows or different tree locations is fine. We used “...” above to signify whatever was already pushed to the ID stack previously:
Begin("MyWindow");
Button("OK");          // Label = "OK",     ID = hash of ("MyWindow", "OK")
End();
Begin("MyOtherWindow");
Button("OK");          // Label = "OK",     ID = hash of ("MyOtherWindow", "OK")
End();
- If you have a same ID twice in the same location, you'll have a conflict:
Button("OK");
Button("OK");          // ID collision! Interacting with either button will trigger the first one.
Fear not! this is easy to solve and there are many ways to solve it!
- Solving ID conflict in a simple/local context: When passing a label you can optionally specify extra ID information within string itself. Use “##” to pass a complement to the ID that won't be visible to the end-user. This helps solving the simple collision cases when you know e.g. at compilation time which items are going to be created:
Begin("MyWindow");
Button("Play");        // Label = "Play",   ID = hash of ("MyWindow", "Play")
Button("Play##foo1");  // Label = "Play",   ID = hash of ("MyWindow", "Play##foo1")  // Different from above
Button("Play##foo2");  // Label = "Play",   ID = hash of ("MyWindow", "Play##foo2")  // Different from above
End();
- If you want to completely hide the label, but still need an ID:
Checkbox("##On", &b); // Label = "", ID = hash of (..., "##On") // No visible label, just a checkbox!
- Occasionally/rarely you might want change a label while preserving a constant ID. This allows you to animate labels. For example you may want to include varying information in a window title bar, but windows are uniquely identified by their ID. Use “###” to pass a label that isn't part of ID:
Button("Hello###ID");  // Label = "Hello",  ID = hash of (..., "###ID")
Button("World###ID");  // Label = "World",  ID = hash of (..., "###ID")  // Same as above, even if the label looks different

sprintf(buf, "My game (%f FPS)###MyGame", fps);
Begin(buf);            // Variable title,   ID = hash of "MyGame"
- Solving ID conflict in a more general manner: Use PushID() / PopID() to create scopes and manipulate the ID stack, as to avoid ID conflicts within the same window. This is the most convenient way of distinguishing ID when iterating and creating many UI elements programmatically. You can push a pointer, a string or an integer value into the ID stack. Remember that ID are formed from the concatenation of everything pushed into the ID stack. At each level of the stack we store the seed used for items at this level of the ID stack.
Begin("Window");
for (int i = 0; i < 100; i++)
{
  PushID(i);           // Push i to the id tack
  Button("Click");     // Label = "Click",  ID = hash of ("Window", i, "Click")
  PopID();
}
for (int i = 0; i < 100; i++)
{
  MyObject* obj = Objects[i];
  PushID(obj);
  Button("Click");     // Label = "Click",  ID = hash of ("Window", obj pointer, "Click")
  PopID();
}
for (int i = 0; i < 100; i++)
{
  MyObject* obj = Objects[i];
  PushID(obj->Name);
  Button("Click");     // Label = "Click",  ID = hash of ("Window", obj->Name, "Click")
  PopID();
}
End();
- You can stack multiple prefixes into the ID stack:
Button("Click");       // Label = "Click",  ID = hash of (..., "Click")
PushID("node");
  Button("Click");     // Label = "Click",  ID = hash of (..., "node", "Click")
  PushID(my_ptr);
    Button("Click");   // Label = "Click",  ID = hash of (..., "node", my_ptr, "Click")
  PopID();
PopID();
- Tree nodes implicitly creates a scope for you by calling PushID().
Button("Click");       // Label = "Click",  ID = hash of (..., "Click")
if (TreeNode("node"))  // <-- this function call will do a PushID() for you (unless instructed not to, with a special flag)
{
  Button("Click");     // Label = "Click",  ID = hash of (..., "node", "Click")
  TreePop();
}
- When working with trees, ID are used to preserve the open/close state of each tree node. Depending on your use cases you may want to use strings, indices or pointers as ID. e.g. when following a single pointer that may change over time, using a static string as ID will preserve your node open/closed state when the targeted object change. e.g. when displaying a list of objects, using indices or pointers as ID will preserve the node open/closed state differently. See what makes more sense in your situation!
Q: How can I display an image? What is ImTextureID, how does it work?
Short explanation:
- Please read Wiki entry for examples: https://github.com/ocornut/imgui/wiki/Image-Loading-and-Displaying-Examples
- You may use functions such as
ImGui::Image(),ImGui::ImageButton()or lower-levelImDrawList::AddImage()to emit draw calls that will use your own textures. - Actual textures are identified in a way that is up to the user/engine. Those identifiers are stored and passed as ImTextureID (void*) value.
- Loading image files from the disk and turning them into a texture is not within the scope of Dear ImGui (for a good reason).
Please read documentations or tutorials on your graphics API to understand how to display textures on the screen before moving onward.
Long explanation:
- Dear ImGui's job is to create “meshes”, defined in a renderer-agnostic format made of draw commands and vertices. At the end of the frame those meshes (ImDrawList) will be displayed by your rendering function. They are made up of textured polygons and the code to render them is generally fairly short (a few dozen lines). In the examples/ folder we provide functions for popular graphics API (OpenGL, DirectX, etc.).
- Each rendering function decides on a data type to represent “textures”. The concept of what is a “texture” is entirely tied to your underlying engine/graphics API. We carry the information to identify a “texture” in the ImTextureID type. ImTextureID is nothing more that a void*, aka 4/8 bytes worth of data: just enough to store 1 pointer or 1 integer of your choice. Dear ImGui doesn't know or understand what you are storing in ImTextureID, it merely pass ImTextureID values until they reach your rendering function.
- In the examples/ bindings, for each graphics API binding we decided on a type that is likely to be a good representation for specifying an image from the end-user perspective. This is what the examples rendering functions are using:
OpenGL:
- ImTextureID = GLuint
- See ImGui_ImplOpenGL3_RenderDrawData() function in imgui_impl_opengl3.cpp

DirectX9:
- ImTextureID = LPDIRECT3DTEXTURE9
- See ImGui_ImplDX9_RenderDrawData() function in imgui_impl_dx9.cpp

DirectX11:
- ImTextureID = ID3D11ShaderResourceView*
- See ImGui_ImplDX11_RenderDrawData() function in imgui_impl_dx11.cpp

DirectX12:
- ImTextureID = D3D12_GPU_DESCRIPTOR_HANDLE
- See ImGui_ImplDX12_RenderDrawData() function in imgui_impl_dx12.cpp
For example, in the OpenGL example binding we store raw OpenGL texture identifier (GLuint) inside ImTextureID. Whereas in the DirectX11 example binding we store a pointer to ID3D11ShaderResourceView inside ImTextureID, which is a higher-level structure tying together both the texture and information about its format and how to read it.
- If you have a custom engine built over e.g. OpenGL, instead of passing GLuint around you may decide to use a high-level data type to carry information about the texture as well as how to display it (shaders, etc.). The decision of what to use as ImTextureID can always be made better knowing how your codebase is designed. If your engine has high-level data types for “textures” and “material” then you may want to use them. If you are starting with OpenGL or DirectX or Vulkan and haven't built much of a rendering engine over them, keeping the default ImTextureID representation suggested by the example bindings is probably the best choice. (Advanced users may also decide to keep a low-level type in ImTextureID, and use ImDrawList callback and pass information to their renderer)
User code may do:
// Cast our texture type to ImTextureID / void*
MyTexture* texture = g_CoffeeTableTexture;
ImGui::Image((void*)texture, ImVec2(texture->Width, texture->Height));
The renderer function called after ImGui::Render() will receive that same value that the user code passed:
// Cast ImTextureID / void* stored in the draw command as our texture type
MyTexture* texture = (MyTexture*)pcmd->TextureId;
MyEngineBindTexture2D(texture);
Once you understand this design you will understand that loading image files and turning them into displayable textures is not within the scope of Dear ImGui. This is by design and is actually a good thing, because it means your code has full control over your data types and how you display them. If you want to display an image file (e.g. PNG file) into the screen, please refer to documentation and tutorials for the graphics API you are using.
Refer to the Wiki to find simplified examples for loading textures with OpenGL, DirectX9 and DirectX11: https://github.com/ocornut/imgui/wiki/Image-Loading-and-Displaying-Examples
C/C++ tip: a void* is pointer-sized storage. You may safely store any pointer or integer into it by casting your value to ImTextureID / void*, and vice-versa. Because both end-points (user code and rendering function) are under your control, you know exactly what is stored inside the ImTextureID / void*. Examples:
GLuint my_tex = XXX;
void* my_void_ptr;
my_void_ptr = (void*)(intptr_t)my_tex;                  // cast a GLuint into a void* (we don't take its address! we literally store the value inside the pointer)
my_tex = (GLuint)(intptr_t)my_void_ptr;                 // cast a void* into a GLuint

ID3D11ShaderResourceView* my_dx11_srv = XXX;
void* my_void_ptr;
my_void_ptr = (void*)my_dx11_srv;                       // cast a ID3D11ShaderResourceView* into an opaque void*
my_dx11_srv = (ID3D11ShaderResourceView*)my_void_ptr;   // cast a void* into a ID3D11ShaderResourceView*
Finally, you may call ImGui::ShowMetricsWindow() to explore/visualize/understand how the ImDrawList are generated.
Q: How can I use my own math types instead of ImVec2/ImVec4?
You can edit imconfig.h and setup the IM_VEC2_CLASS_EXTRA/IM_VEC4_CLASS_EXTRA macros to add implicit type conversions. This way you'll be able to use your own types everywhere, e.g. passing MyVector2 or glm::vec2 to ImGui functions instead of ImVec2.
Q: How can I interact with standard C++ types (such as std::string and std::vector)?
- Being highly portable (bindings for several languages, frameworks, programming style, obscure or older platforms/compilers), and aiming for compatibility & performance suitable for every modern real-time game engines, dear imgui does not use any of std C++ types. We use raw types (e.g. char* instead of std::string) because they adapt to more use cases.
- To use ImGui::InputText() with a std::string or any resizable string class, see misc/cpp/imgui_stdlib.h.
- To use combo boxes and list boxes with std::vector or any other data structure: the BeginCombo()/EndCombo() API lets you iterate and submit items yourself, so does the ListBoxHeader()/ListBoxFooter() API. Prefer using them over the old and awkward Combo()/ListBox() api.
- Generally for most high-level types you should be able to access the underlying data type. You may write your own one-liner wrappers to facilitate user code (tip: add new functions in ImGui:: namespace from your code).
- Dear ImGui applications often need to make intensive use of strings. It is expected that many of the strings you will pass to the API are raw literals (free in C/C++) or allocated in a manner that won't incur a large cost on your application. Please bear in mind that using std::string on applications with large amount of UI may incur unsatisfactory performances. Modern implementations of std::string often include small-string optimization (which is often a local buffer) but those are not configurable and not the same across implementations.
- If you are finding your UI traversal cost to be too large, make sure your string usage is not leading to excessive amount of heap allocations. Consider using literals, statically sized buffers and your own helper functions. A common pattern is that you will need to build lots of strings on the fly, and their maximum length can be easily be scoped ahead. One possible implementation of a helper to facilitate printf-style building of strings: https://github.com/ocornut/Str This is a small helper where you can instance strings with configurable local buffers length. Many game engines will provide similar or better string helpers.
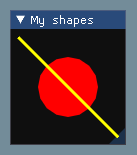
Q: How can I display custom shapes? (using low-level ImDrawList API)
- You can use the low-level
ImDrawListapi to render shapes within a window.
ImGui::Begin("My shapes");

ImDrawList* draw_list = ImGui::GetWindowDrawList();

// Get the current ImGui cursor position
ImVec2 p = ImGui::GetCursorScreenPos();

// Draw a red circle
draw_list->AddCircleFilled(ImVec2(p.x + 50, p.y + 50), 30.0f, IM_COL32(255, 0, 0, 255), 16);

// Draw a 3 pixel thick yellow line
draw_list->AddLine(ImVec2(p.x, p.y), ImVec2(p.x + 100.0f, p.y + 100.0f), IM_COL32(255, 255, 0, 255), 3.0f);

// Advance the ImGui cursor to claim space in the window (otherwise the window will appears small and needs to be resized)
ImGui::Dummy(ImVec2(200, 200));

ImGui::End();
- Refer to “Demo > Examples > Custom Rendering” in the demo window and read the code of
ShowExampleAppCustomRendering()inimgui_demo.cppfrom more examples. - To generate colors: you can use the macro
IM_COL32(255,255,255,255)to generate them at compile time, or useImGui::GetColorU32(IM_COL32(255,255,255,255))orImGui::GetColorU32(ImVec4(1.0f,1.0f,1.0f,1.0f))to generate a color that is multiplied by the current value ofstyle.Alpha. - Math operators: if you have setup
IM_VEC2_CLASS_EXTRAinimconfig.hto bind your own math types, you can use your own math types and their natural operators instead of ImVec2. ImVec2 by default doesn't export any math operators in the public API. You may use#define IMGUI_DEFINE_MATH_OPERATORS#include "imgui_internal.h"to use the internally defined math operators, but instead prefer using your own math library and set it up inimconfig.h. - You can use
ImGui::GetBackgroundDrawList()orImGui::GetForegroundDrawList()to access draw lists which will be displayed behind and over every other dear imgui windows (one bg/fg drawlist per viewport). This is very convenient if you need to quickly display something on the screen that is not associated to a dear imgui window. - You can also create your own dummy window and draw inside it. Call Begin() with the NoBackground | NoDecoration | NoSavedSettings | NoInputs flags (The
ImGuiWindowFlags_NoDecorationflag itself is a shortcut for NoTitleBar | NoResize | NoScrollbar | NoCollapse). Then you can retrieve the ImDrawList* via GetWindowDrawList() and draw to it in any way you like. - You can create your own ImDrawList instance. You'll need to initialize them with
ImGui::GetDrawListSharedData(), or create your own instancing ImDrawListSharedData, and then call your renderer function with your own ImDrawList or ImDrawData data.
Return to Index
Q&A: Fonts, Text
Q: How can I load a different font than the default?
Use the font atlas to load the TTF/OTF file you want:
ImGuiIO& io = ImGui::GetIO();
io.Fonts->AddFontFromFileTTF("myfontfile.ttf", size_in_pixels);
io.Fonts->GetTexDataAsRGBA32() or GetTexDataAsAlpha8()
Default is ProggyClean.ttf, monospace, rendered at size 13, embedded in dear imgui's source code.
(Tip: monospace fonts are convenient because they allow to facilitate horizontal alignment directly at the string level.)
(Read the misc/fonts/README.txt file for more details about font loading.)
New programmers: remember that in C/C++ and most programming languages if you want to use a backslash \ within a string literal, you need to write it double backslash “\”:
io.Fonts->AddFontFromFileTTF("MyFolder\MyFont.ttf", size);  // WRONG (you are escape the M here!)
io.Fonts->AddFontFromFileTTF("MyFolder\\MyFont.ttf", size;  // CORRECT
io.Fonts->AddFontFromFileTTF("MyFolder/MyFont.ttf", size);  // ALSO CORRECT
Q: How can I easily use icons in my application?
The most convenient and practical way is to merge an icon font such as FontAwesome inside you main font. Then you can refer to icons within your strings. You may want to see ImFontConfig::GlyphMinAdvanceX to make your icon look monospace to facilitate alignment. (Read the misc/fonts/README.txt file for more details about icons font loading.) With some extra effort, you may use colorful icon by registering custom rectangle space inside the font atlas, and copying your own graphics data into it. See misc/fonts/README.txt about using the AddCustomRectFontGlyph API.
Q: How can I load multiple fonts?
Use the font atlas to pack them into a single texture: (Read the misc/fonts/README.txt file and the code in ImFontAtlas for more details.)
ImGuiIO& io = ImGui::GetIO();
ImFont* font0 = io.Fonts->AddFontDefault();
ImFont* font1 = io.Fonts->AddFontFromFileTTF("myfontfile.ttf", size_in_pixels);
ImFont* font2 = io.Fonts->AddFontFromFileTTF("myfontfile2.ttf", size_in_pixels);
io.Fonts->GetTexDataAsRGBA32() or GetTexDataAsAlpha8()
// the first loaded font gets used by default
// use ImGui::PushFont()/ImGui::PopFont() to change the font at runtime

// Options
ImFontConfig config;
config.OversampleH = 2;
config.OversampleV = 1;
config.GlyphOffset.y -= 1.0f;      // Move everything by 1 pixels up
config.GlyphExtraSpacing.x = 1.0f; // Increase spacing between characters
io.Fonts->AddFontFromFileTTF("myfontfile.ttf", size_pixels, &config);

// Combine multiple fonts into one (e.g. for icon fonts)
static ImWchar ranges[] = { 0xf000, 0xf3ff, 0 };
ImFontConfig config;
config.MergeMode = true;
io.Fonts->AddFontDefault();
io.Fonts->AddFontFromFileTTF("fontawesome-webfont.ttf", 16.0f, &config, ranges); // Merge icon font
io.Fonts->AddFontFromFileTTF("myfontfile.ttf", size_pixels, NULL, &config, io.Fonts->GetGlyphRangesJapanese()); // Merge japanese glyphs
Q: How can I display and input non-Latin characters such as Chinese, Japanese, Korean, Cyrillic?
When loading a font, pass custom Unicode ranges to specify the glyphs to load.
// Add default Japanese ranges
io.Fonts->AddFontFromFileTTF("myfontfile.ttf", size_in_pixels, NULL, io.Fonts->GetGlyphRangesJapanese());

// Or create your own custom ranges (e.g. for a game you can feed your entire game script and only build the characters the game need)
ImVector<ImWchar> ranges;
ImFontGlyphRangesBuilder builder;
builder.AddText("Hello world");                        // Add a string (here "Hello world" contains 7 unique characters)
builder.AddChar(0x7262);                               // Add a specific character
builder.AddRanges(io.Fonts->GetGlyphRangesJapanese()); // Add one of the default ranges
builder.BuildRanges(&ranges);                          // Build the final result (ordered ranges with all the unique characters submitted)
io.Fonts->AddFontFromFileTTF("myfontfile.ttf", 16.0f, NULL, ranges.Data);
All your strings needs to use UTF-8 encoding. In C++11 you can encode a string literal in UTF-8 by using the u8“hello” syntax. Specifying literal in your source code using a local code page (such as CP-923 for Japanese or CP-1251 for Cyrillic) will NOT work! Otherwise you can convert yourself to UTF-8 or load text data from file already saved as UTF-8.
Text input: it is up to your application to pass the right character code by calling io.AddInputCharacter(). The applications in examples/ are doing that. Windows: you can use the WM_CHAR or WM_UNICHAR or WM_IME_CHAR message (depending if your app is built using Unicode or MultiByte mode). You may also use MultiByteToWideChar() or ToUnicode() to retrieve Unicode codepoints from MultiByte characters or keyboard state. Windows: if your language is relying on an Input Method Editor (IME), you copy the HWND of your window to io.ImeWindowHandle in order for the default implementation of io.ImeSetInputScreenPosFn() to set your Microsoft IME position correctly.
Return to Index
Q&A: Community
Q: How can I help?
- If you are experienced with Dear ImGui and C++, look at the GitHub Issues, look at the Wiki, read docs/TODO.txt and see how you want to help and can help!
- Businesses: convince your company to fund development via support contracts/sponsoring! This is among the most useful thing you can do for Dear ImGui. With increased funding we will be able to hire more people working on this project.
- Individuals: you can also become a Patron or donate on PayPal! See README.
- Disclose your usage of dear imgui via a dev blog post, a tweet, a screenshot, a mention somewhere etc. You may post screenshot or links in the gallery threads. Visuals are ideal as they inspire other programmers. But even without visuals, disclosing your use of dear imgui help the library grow credibility, and help other teams and programmers with taking decisions.
- If you have issues or if you need to hack into the library, even if you don't expect any support it is useful that you share your issues or sometimes incomplete pR.